MDF Products
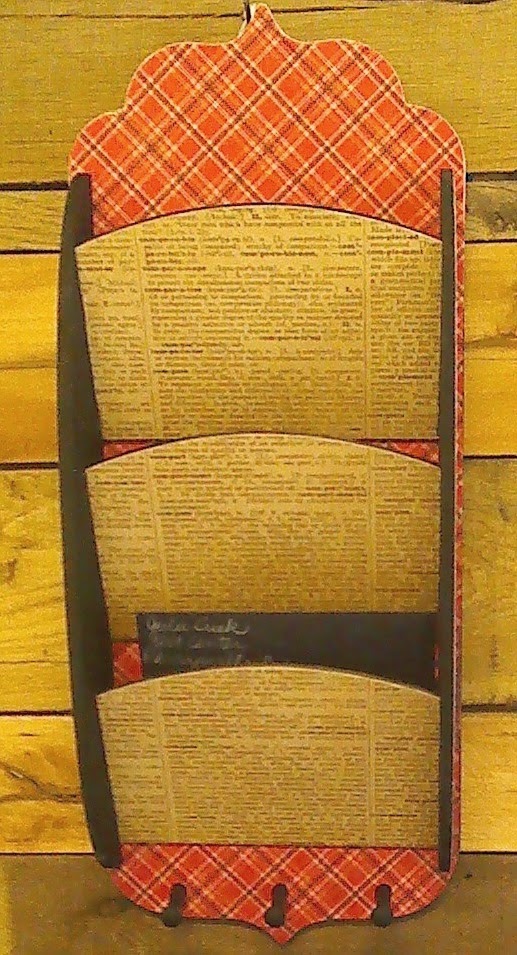
We are loving the MDF products around here! They are so easy to accent and decorate with. You can adhere paper using Scotch Quick Dry Adhesive for your own custom look. When combined with paint this provides a stunning look!
This family board is awesome because it comes in two pieces. Take them apart and paint them your desired color. Then adhere paper to the background. Glue the entire piece back together and accent as desired!
I accented the family board with one sheet of chipboard, clothes pins and die cut flourish. Those products can be found here.
MDF Products We are loving the MDF products around here! They are so easy to accent and decorate with. You can adhere paper using Scotch ...
Join me to support raising funds to end cancer
and honor our friend Susan Fischer!
Scrappin For Susan
Warren County Indiana Fairgrounds
June 7th 9am-6pm
To attend all day the fee is $25.00. This includes scrapbook space, lunch and snacks provided. Goodie bags.
You can attend this event as a non scrapbooking particpant, support the silent auction, shop the vendors, and participate in make and takes at NO CHARGE. All funds raised in the silent auction go to Warren County Walk for Life!
I will be at this event from 9am-1pm!
I will be bringing supplies to purchase, and quite a large selection of clearance merchandise!
I am also offering this card Make and Take for just $2.00 per card.
ALL FUNDS RAISED FROM THIS CARD WILL BE DONATED!
I am bringing all the supplies needed to make this card!
You don't have to know how to craft or scrapbook to make this card! I will teach you!
If you are planning on attending this event and want to purchase these products can you email me and let me know so that I can have appropriate stock on hand?
Join me to support raising funds to end cancer and honor our friend Susan Fischer! Scrappin For Susan Warren County Indiana Fai...
You may or may not know I have a love for old books.
You may or may not know I have a habit of making things for old books.
You may or may not know my Mother about croaked when she saw me making flowers from an old bible.
You may or may not know that flowers give me joy.
You may or may not know I have been playing around with various kinds of flower designs for a LONG time.
You may or may not know We R Memory Keepers came out with a new product called THE FLOWER PUNCH BOARD.
You can view the video here
After watching the video make a few practice flowers. Then follow my tips below for making a stem head for your flower!
I did not care for the "flat" centers of the flowers. I wanted a smaller dimensional stem head for the middle. You will notice that I added two black marks on my board with a sharpie marker. These marks sit 1/4" and 1/2" to the LEFT of the vertical score line on the board. To make the center of the flower cut the paper the same as the board suggests for the smallest flower (the first one). Start the flower the same as you normally would but use the 1/2" sharpie line INSTEAD of the XXS line. (you'll have to know how to make the flower first, and you can watch the video above to see that part). I seldom use the 1/4" mark as that is very small.
Here is what you end up with!
The Flower Punch board comes with a rolling tool but I wanted a "tighter" roll so I used my petal rolling tool.
Use the "slotted" end of the tool and slip it on the edge of the flower.
Roll all the "petals".
Place the tool on the end of the strip as shown, and carefully start rolling up the end.
Roll about 1".
Pull back on the tool and remove it.
I use Beacon's 3 in 1 for the flower making. I used it on all the flowers. I like the thick grip, and strong hold. Unroll your piece, and put adhesive along the bottom edge. I used pipe cleaners for the stem. I strengthened them by twisting two together. Place adhesive along the bottom edge of the flower strip, and roll it up around the pipe cleaner.
Roll it up!
You only need to roll up an inch or so and you will notice that the petal leaves all start rolling around at the exact same place on the stem. When you see this start to happen stop and cut the paper off.
You can then trim off one petal at a time and glue them on individually. I only glue two petals by hand. You do not want this piece to become too "thick". When you go to add the first xxs small flower, you will need to slide that flower onto the stem head you are making. IF the stem head is too fat at the base, your flower won't slide onto the stem head.
Complete!
Make your first smallest flower according the the directions.
The board comes with a rolling tool.
It works good for a large loose roll when used like shown above. For the smaller flowers I prefer the petal rolling tool I shared with you earlier.
Flower with rolled edges.
Slip the flower onto the stem head. Pull the XXS flower up onto the paper of the stem head and adhere with Beacon's or your favorite adhesive.
YEH!
To finish the flower as I've done the flower has the following pieces.
The stem head center you make by hand as shown above.
The xxs size.
The xs size.
The small size.
Make another xxs size, and place it on the BACK of the flower, and roll the edges DOWN. If you look at the photo below you will see the small piece on the back. This piece covers up the "ugly" back of the larger flower pieces...and it looks FAB!!
If you enjoyed this blog post and decide to order the punch board would you please consider purchasing from us? This tool is in our online store here. It can be found at our booth at Rabbittwon Antiques and Artisans at 412 East Main Street in Danville, Illinois, or it can be purchased when you visit our Retreat House in Perrysville, Indiana. (we do not have regular store hours at retreat house so call before coming). When you support our business with purchases it enables us to continue to produce educational blog posts and videos!
May is a great time to visit River Retreat House and I do have some open dates! Contact me for details at
Enjoy Every Moment Page Kit! Great for Summer Photos only $5.99 on our website here! It's a beautiful life page ...
Join me at Scrap Camp March 14-17, 2014 for a great weekend of scrapbooking and paper crafting. Join us for the entire weekend or just come and take a class!
You can view more details on our website here. If you have questions call 765 793 2523 or email creekbc@gmail.com
Julie Creek
Creek Bank Creations, Inc.
River Retreat House
$100.00 weekend retreats
Scrap Camp
This class will last the entire day. 10am-6pm. You will complete basic construction and finish the accents on your own. This class is not appropriate for beginning scrapbookers. Bring your lunch and plan a creative day making a one of kind unique album. We provide a refrigerator and a microwave for your lunch, and pleny of room for you to spread out and work during class.
GATE FOLD FOLIO - Class Description
In this class, we will be learning to use varied techniques to construction a full size (10” x 12”) interactive gate fold album. The basic construction of this album includes multiple variations of the pocket page. The album will accommodate pictures up to 8” x 10”. It will contain lots and lots of Real Estate to attach photos to. The techniques presented in this class are techniques that can be adapted to create other album types. A moderate to advanced skill level is required to meet the challenge of this class.
GATE FOLD FOLIO - SUPPLIES
Kit Contents – we provide
Full Tutorial
Medium Weight Chipboard – cut to measure for cover
One metal swing closure & findings for mounting
Chipboard mount for swing closure
Individual Personal Supplies – you provide. You must provide all the supplies and tools on the list. Please print the supply list off NOW because once the class sells out the list will not be online. Because this class is very in depth we request EACH PERSON have their own tools. If you need supplies for class please allow Creek Bank Creations to supply them. Our ability to offer cutting edge classes depends on your support! (please contact us at least a week before class)
1) – Pattern paper pack or multiple sheets coordinating designer paper – can be single or double sided – at least 16 sheets. Be sure to bring enough sheets to account for “mistakes”. – Packaged collections work well. If you need a certain paper pack or cardstock please contact us and allow us to supply your needs.
2) – 12 x 12 solid color cardstock black, cream or white (This will be used as the base paper for the album. Select the solid color suitable to your pattern paper selection.) – 16 pieces Again, allow enough to account for “mistakes”.
3) – 1 ½” circle punch
4) – Decorative border punch, scissors or decorative cutter blade for paper trimmer




 Posts


