Recipe Box chipboard Kit!
Today we'll start showing our new line of chipboard called
Blanco Board.

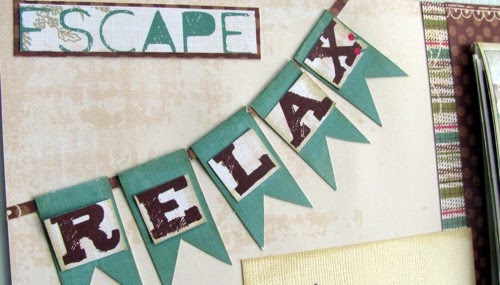
Blanco Board is a lighter weight material from our darker chipboard. (Don't worry we are still making it, and have new skus in that catergory as well)  The lighter thickness of Blanco Board  makes it easier to use on scrapbook pages.  The white faced front will give you tons of options to accent it with. Use ink, paint, stamps, embossing powder, mists and more to accent Blanco Board.  The layouts below show some of the uses and fun you can have with it.

Home Sweet Home Layout using Scroll Blanco Board.
Blanco Board Scroll on our site here.

Dog is Good Layout using God is Good Blanco Board
Blanco Board Dog is Good on our site here.
Both layouts will be available in kit form as well by the end of the month.

This is a fast and easy project to make!
Simply purchase the raw recipe box on our website,
and then order the recipe box kit.

The recipe box kit contains all the chipboard pieces you need to make the box as shown.  It contains the word YUM, the label on the front of the box and the recipe cards that fit inside the box. 

Accent the box with ink.
Cover the box with paper in your desired theme.
Accent with chipboard parts as shown.
Fast.
Easy.
Fun.

Blanco Board starts shipping March 13th. 
Julie Creek
Creek Bank Creaitons, Inc.
www.creekbankcreations.com

Recipe Box

by on 12:09 PM
Recipe Box chipboard Kit! Today we'll start showing our new line of chipboard called Blanco Board. Blanco Board is a lighter we...
WE R Memory Keepers Vintage T


The Vintage T papers are available on our website here!

We've also put together a layout kit with Vintage T.
This layout features our page extension product.  The page extensions are clear sleeves that you can adhere to pages. They can be inserted onto the top of pages, or in the middle of an album. You fill the sleeve with paper, and add photos!
 The page extension is shown below open!  More photos and a big journaling box are revealed!

Buy the "Guy Time" layout Kit Here!
Buy a package of page extensions here!

Julie Creek
Creek Bank Creations, Inc.

Happy Halloween layout with photo Fold out! 
Our Halloween layout holds 13 photos!  It features Creek Bank Creations Large photo fold out, which opens to reveal more photos!
This layout includes all the paper, the large photo fold out, the magnetic snap, the protective sleeves, all the paper and complete instructions!
Order the Halloween Layout Here!
More Layout Kits on our website here!
Order the Large Photo Fold out by itself here
By Magnetic Snaps here!
Julie Creek
Creek Bank Creations, Inc.
Escape and Relax Layout Kit
using Paradise Paper from Little Yellow Bicycle!

How about a fun layout featuring Little Yellow Bicycle and Creek Bank Creations Large Photo fold out? 

The photo above shows the alyout with the large photo fold out closed. 
Adding the large photo fold out gives you room for 14 photos!

This layout includes all the paper, the large photo fold out, the magnetic snap, the Little Yellow Bicycle Confetti garland and complete instructions!

Order the Escape and Relax Layout Here!
More Layout Kits on our website here!
Order the Large Photo Fold out by itself here
By Magnetic Snaps here!
By more paper from the Little Yellow Bicycle Paradise line here!
Julie Creek
Creek Bank Creations, Inc.

Escape and Relax Layout Kit

by on 3:29 PM
Escape and Relax Layout Kit using Paradise Paper from Little Yellow Bicycle! How about a fun layout featuring Little Yellow Bicycle an...
Summer Sunshine and Happiness Layout Kit!
 It's our first showing of one of the new Bella Blvd. Lines!  Sunshine and Happiness from Bella Blvd. is full of bright happy colors, and we've teamed it up with our photo fold out to make a great layout kit!
 The photo above shows the photo fold out open.  This layout can easily hold 10 4x4 or 4x6 photos, plus three 2x2 photos. (and that doesn't include that cute little pocket on the right that could hold more). 
This layout kit contains all the papers, the bakers twine, the photo fold out, a magnetic snap, protective sleeves for the photo fold out and complete instructions.   This layout kit will ship when the product arrives in the first of March. 

Order the Summer Sunshine and Happiness Kit here.

Order the Large Photo Fold Out Here.
Order Magnetic Snaps Here.

Retailers you can offer this layout as a class in your store.  Read here to find out how.

Julie Creek
Creek Bank Creations, Inc.
www.creekbankcreations.com


New Layout Kit from Creek Bank Creations!
Features new Bo Bunny Line On The Go and
Creek Bank Creations large Photo Fold out!
Our page kit named BOY OH BOY is a two page layout using Bazzill Cardstock and Bo Bunny Press Pattern Paper.  We provide the title pre-cut all the papers, the large photo fold out and the manetic snap!

 This layout will easily fit 13 photos!
Retailers...like this kit? Order 12 packages of Large photo fold outs and request a FREE PDF of this layout to use in class. 

Purchase the kit here.
Purchase the large photo fold out here.  

This layout will ship when the product arrives.  (mid to late February)
Julie Creek
Creek Bank Creations, Inc.

New Layout Kit!

by on 2:46 PM
New Layout Kit from Creek Bank Creations! Features new Bo Bunny Line On The Go and Creek Bank Creations large Photo Fold out! Our p...
 The photo above is Heidi Swapp.  Some of you may know her, some of you may not.  Heidi Swapp is an artist who has been around the scrapbook community for years.  On her blog she says she is "a scrapbooker".  That might be the most humble statement I've ever read from a scrapbook mega star.  She's developed hundreds of products for this industry.  She is an innovator in every since of the word.  She is a teacher, and is very gifted at sharing her gift with others.  She hasn't contributed many products for resale in the market for a few years, so those of you new to scrapbooking may not know who she is!  She is back, and her products are a top pick from me for this season.
 The photo above shows a close up of the border sections which are my favorite.  What is so great about that?  These pieces are made to take color, yet resist.  This means you can accent any of the product line with color...think ink pad, think copic, think Distress Markers, think water color pencils....think think think about the fun possibilities!  You can turn these pieces into any color you WANT!  Here is the video of Heidi with the product at the winter buying show.


It's a great product that is sure to be in short supply! Pre order today!
Use coupon redemption code SWAPP and save 10% off your Heidi Swapp Color Magic Pre Order.  (This coupon may NOT be combined with any other offers, and does not apply to clearance or the distress marker set.


Some general updates:
1.  I am looking for photos for layouts we are working on.  I need good quality photos of grandchildren, and good quality photos of boys playing with trucks.  I need a grouping of at least 15 photos.  If you have photos you can send me a few jpegs at creekbc@comcast.net.  If I can use them I will contact you, and we'll talk payment.  If you don't hear back from me I could not use the photos for what we are working on.  These photos will be used on layouts that we travel to shows with.  We will NOT identify your child.

2.  Upcoming dates: (shows we will vendor at)
      March 23, 24 Columbus Ohio Memories Expo
      March 30 31 Creating Keepsakes Louisville, KY
      April 20-21  Milwaukee, WI Scrapbook Expo  (this is a new show!!) 
Something to note for our customers...Creating Keepsakes has moved the date of the St. Louis Show to June 8-9.  This show has always been held in April so mark your calendar! 

3. Many of you received new credit cards as of Jan 1, 2012 because of your expiration dates expiring.  When you place on line orders you need to have the NEW v code on the back left of your card.  I am seeing alot of declines come through the site with cvv2 code mismatch errors.  This means you've typed in the wrong code.  Please note a new card, means a new v code!

4.  We still have a few sets of Tim Holtz Distress Markers. We are offering the set at a special pre order price of $99.99 with free freight.  You can view the video of Tim Holtz here.
Pre order markers here!
Thank you to each and every one of you who continue to support our family owned business.  I stand amazed at your willingness to tell you scrapbooking buddies about our site, and it's because of you we continue to develop new products, and inspired designs!

We've got tons of new products on the way!  Keep watching for updates!
Julie Creek
Creek Bank Creations, Inc.

PRE ORDER COLOR MAGIC

by on 10:20 AM
 The photo above is Heidi Swapp.  Some of you may know her, some of you may not.  Heidi Swapp is an artist who has been around the scrapbo...
Mini Envelope Book.  A unique design from Creek Bank Creations!

This mini envelope album comes in a package with envelopes, heavyweight chipboard covers and complete instructions.  Because the kit comes RAW you can accent the book and turn it into any kind of book you want.  I recommend three pieces of pattern paper (matching), 1-6x12 of matching cardstock your color choice, and 1-6x12 of white cardstock to complete the kit.

We added a Tim Holtz Hitch Fastener to the front of our mini books, they are not included in the basic kit and can be found on our website here.
 The photo above shows how the package comes to your door.  This shows our retail friends what the package looks like.  Please note it is NOT bar coded and comes priced.
If you would like to purchase the Mini envelope book as a kit I've put one together for you.  This kit comes all the papers,(and entire 6x6 paper pad with lots of papers left over),  chipboard, hitch fastener, bakers twine, complete instructions and color photos.  I made the book to hold encouraging scripture verses, and I've included my favorites in the kit.  You can use the scriptures as they are, or you can simply cut your own tags and add photos instead.


To complete this kit you will need:
1. Scotch Quick Dry Adhesive
2.  Crop A Dile for punching chipboard
3.  Creek Bank Creations Sanding Stick
4.  Corner Rounder
5.  Red ink
6. scissors
7. Pencil
8.  Paper cutter

Create something meaningful!
Julie Creek
Creek Bank Creations, Inc.
www.creekbankcreations.com

Mini Envelope Book

by on 2:14 PM
Mini Envelope Book.  A unique design from Creek Bank Creations! This mini envelope album comes in a package with envelopes, heavywei...
Tim Holtz Distress Markers PRE ORDER

You won't be disappointed when you see the video below of the new Distress Markers from Ranger and Tim Holtz...


Imagine owning all of these wonderful colors! 
The entire set retails for $114.00.  We are offering a limited time offer pre-order price of just
$99.99
For the entire set.  This is a limited edition offer.  We have already placed our order with Ranger and we are looking at shipping around Feb 20. 

In the video you'll see Tim using lots of other great things!
Speciality Stamping Paper
The Ink Blending Tool


Two new blending tools that are great with the pens and watercolor crayons!
Frayed Burlap Distress Ink


I have placed all these new items on the same page so you can shop them easily.  They are found here!
FREE FREIGHT ON ALL ORDERS OVER $50.00

Any order that contains pre ordered items will be held and shipped together. 

Have a great weekend!
Julie Creek
Creek Bank Creations, Inc.

The Horizontal Photo Fold Out Instructions
Photobucket
Open the package and you'll find three white pieces. From right to left they are tag, tag pocket, and base.

If you are placing a magnetic snap on your project you need to place that first.  (these snaps are not included with the product. You can tie this shut with ribbon or buy the snaps here)
Locate the snaps and place them together.  Positive facing one way, negative the other.  (stick them together)
Peel the paper sticker (this is marking the piece positive and negative) off the postive side the adhere it to the inside top piece as shown above.


Peel the paper from the top (marked negative) and fold the base piece SHUT.  This will make the negative side stick to the bottom base piece. 

Photobucket

Carefully pull the flaps of the base unit open, leaving a positive on one side and the negative on the top!
Next locate the pocket tag piece. Punch the circle out.
Decide on your paper for the tag pocket front and cut that paper 9 3/4"x4".

To place to hole properly on the paper use a small piece of adhesive and stick the paper to the front (temporary).  Turn the entire piece OVER and use a pencil to trace where to circle is.
Photobucket
Remove the pattern paper and use scissors to cut the circle shape out. 

Adhere the paper to the front. 

Use a paper distresser all along the inside edge of the circle.  This will hide any uneven cutting that you've done.

Now Adhere the back shut so you have a pocket.

If you want to accent the inside back cut a piece 9 3/4"x4" and adhere it into the BACK of the pocket piece.  To accent the front of the piece cut a piece of paper 9.5"x4".  Slip it into place.

Locate the page protector that is a long sleeve shape.  Place this piece into your paper cutter and trim it to 9.75" long. 

If you want to put pattern paper on the tag itself I cut my pieces 7.5"x4".
Slide the tag piece into the pocket, and slide the entire piece into the sleeve. Add photos to this piece as desired.

To accent the base top flaps cut two pieces of paper 9 5/8" long x 4 3/16" wide. (refer to the diagram for placement). Adhere the tag pocket (in the protectirve sleeve on the inside of the base.  Adhere.

To accent the base bottom flaps cut two pieces of paper 9 5/8" long x 4.5" wide.  Adhere. Add photos as desired.
Photobucket
Locate your top flap and accent it as desired.  Locate the page sleeves and slide them onto the top and bottom flaps of the base.  The self seal strips will be attached to the BACK of the base. 
Photobucket
Attach the piece to the layout. The horizontal photo fold out attached to the layout closed.
Photobucket
The horizontal photo fold out attached to the layout open. This layout will easily accomodate 13 photos! 

Photobucket

The close up of the horizontal photo fold out.
Buy the horizontal photo fold here!
So how does that fit into a page protector?      
Make your page.
1. Slide your page into the page protector.
2. Use a dull pencil, or an embossing stylist, and trace around the outside edge of the shape.
3. Take the page out of the page protector.
4. Slide a scrap paper or cutting mat into the page protector, and cut on the line you've created.
5. Slide your page back into the page protector and it fits perfectly.

Photobucket
Did you like the layout? This layout was created with the BRAND NEW Paper line from Bo Bunny Press called Alora!  We are offering this layout in kit form.  The kit contains full instructions, the paper, the bakers twine, a magnetic snap and one photo fold out.  (estimanted ship time Feb 20)  

Photobucket

Buy The Kids Are Grand Layout Kit here.
Buy The Horizontal Photo Fold Out Here.
Buy Magnetic Snaps Here.
Buy The Paper Distresser Here.

Julie Creek
Creek Bank Creations, Inc.
www.creekbankcreations.com
by on 2:15 PM
The Horizontal Photo Fold Out Instructions Open the package and you'll find three white pieces. From right to left they are tag, t...